Deploy Ruby On Rails:
Ubuntu 24.04 Noble Numbat in 2024

The definitive guide to deploying Ruby on Rails to production to your Virtual Private Server (VPS).

If you've ever wondered how to deploy Ruby on Rails to production on your own server, you've come to the right place.

I wrote this guide to cover the ENTIRE process from choosing a server, installing dependencies, configuring NGINX, setting up your database, and making your first deployment using Capistrano.

So if you're looking to step up your Ruby on Rails game this year, you'll love this guide.

Contents

Chapter 1:

Creating a Production Server


A Virtual Private Server (VPS) is where our Rails application and all it's relevant services will live.

We have a ton of different options for this, so we'll discuss where to find a good VPS and how large of a server you should choose.

Choosing a Server Hosting Provider

There are many, many options when it comes to hosting providers. These are the places that own servers in a datacenter and will rent them out to you monthly.

It's important to buy a server at a place like this because they will handle issues with hardware failures and provide you a super fast internet connection which is crucial to running anything in production on the internet.

Ignore managed hosting providers. They don't give enough control over your server to set things up and they're usually very outdated.

Here are some hosting provider options:

I recommend DigitalOcean. It's super cheap, really fast, and the easiest to use by far. You'll save a good amount of money by using them and they continue offering lots of new products.

Plus, if you use my DigitalOcean link, you'll get $100 in free credit to spend over 60 days! That's a perfect way to try things out and see how it goes without spending a dime.

What Size Server Do I Need?

Ruby and Rails apps tend to require a lot of RAM, so that's the main metric we're going to be focusing on when deciding what size server we should use. Plus, we'll need to run a database like Postgresql or MySQL as well as Redis for background workers. Each of these will require RAM to operate so we want to take those into account too.

I recommend a 2GB RAM server ($10/mo) if you're deploying for the first time. You might even be able to get by with a 1GB server, but you'll likely run out of RAM when compiling assets during deployment to production.

GoRails uses a 4GB RAM server ($20/mo) and serves over 2 MILLION pages per year! That's quite a lot of traffic and the server barely breaks a sweat.

If you have large dependencies like ElasticSearch, you'll have to add more RAM. ElasticSearch, for example, requires 4GB of RAM at a minimum, so you'll need to consider that in addition to what RAM you need for your Ruby and Rails apps. You can run ElasticSearch on a separate server to make it easier to scale the services up separately.

Create Your Server

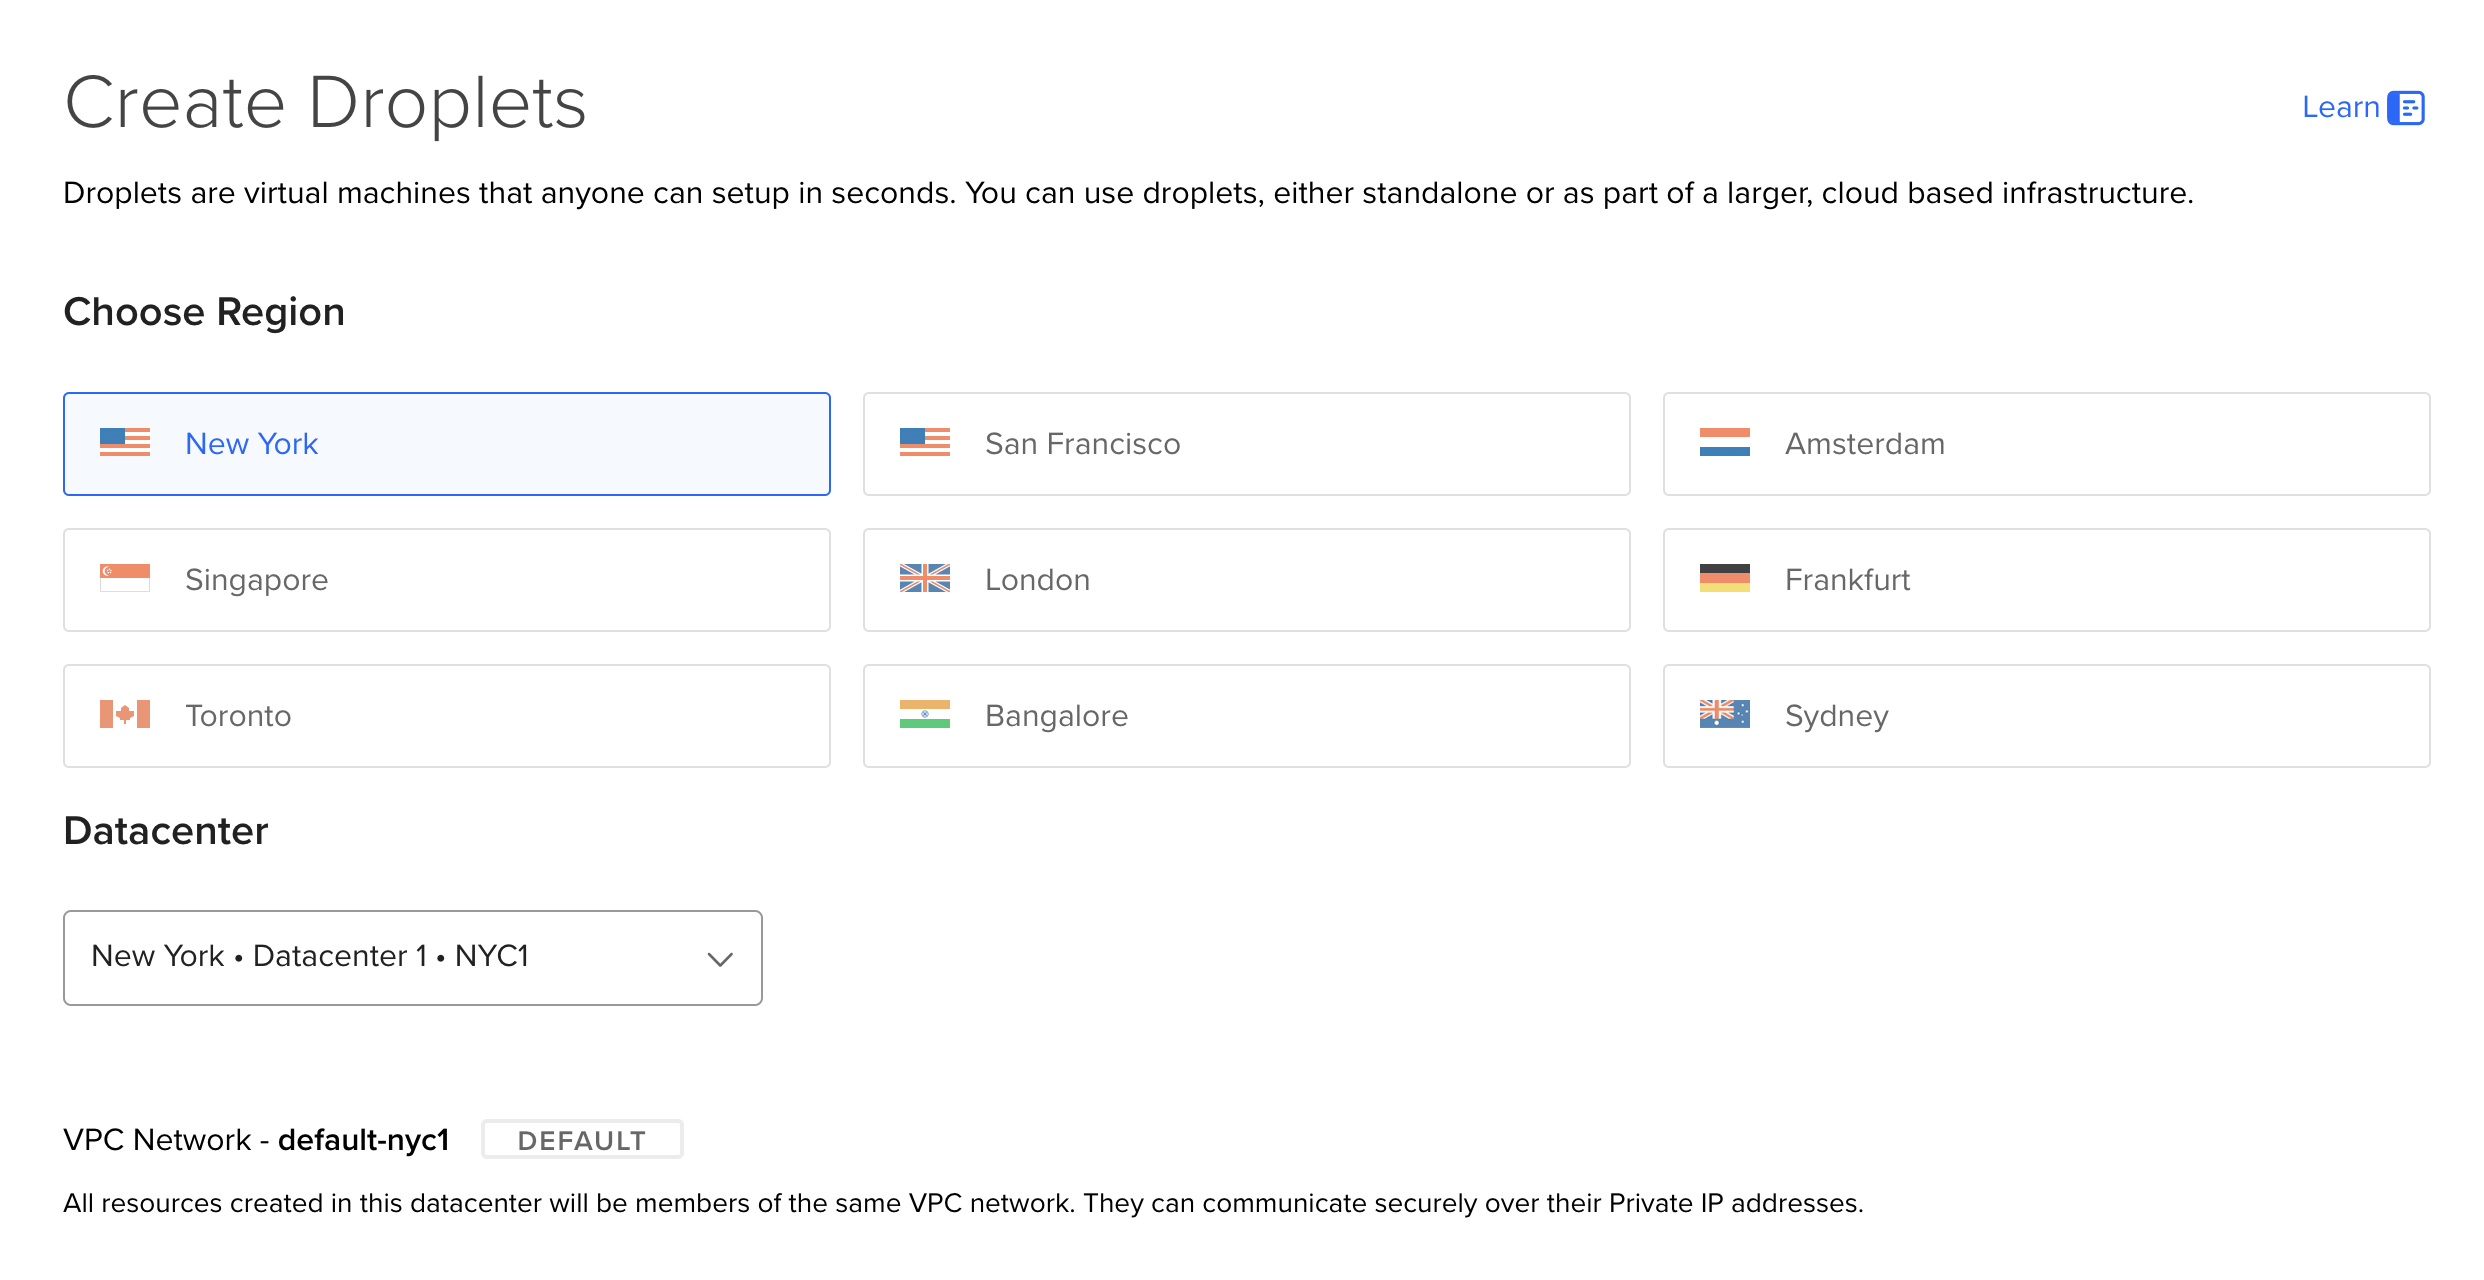
It's time for us to create our server. Open up DigitalOcean and go to the Create Droplet page.

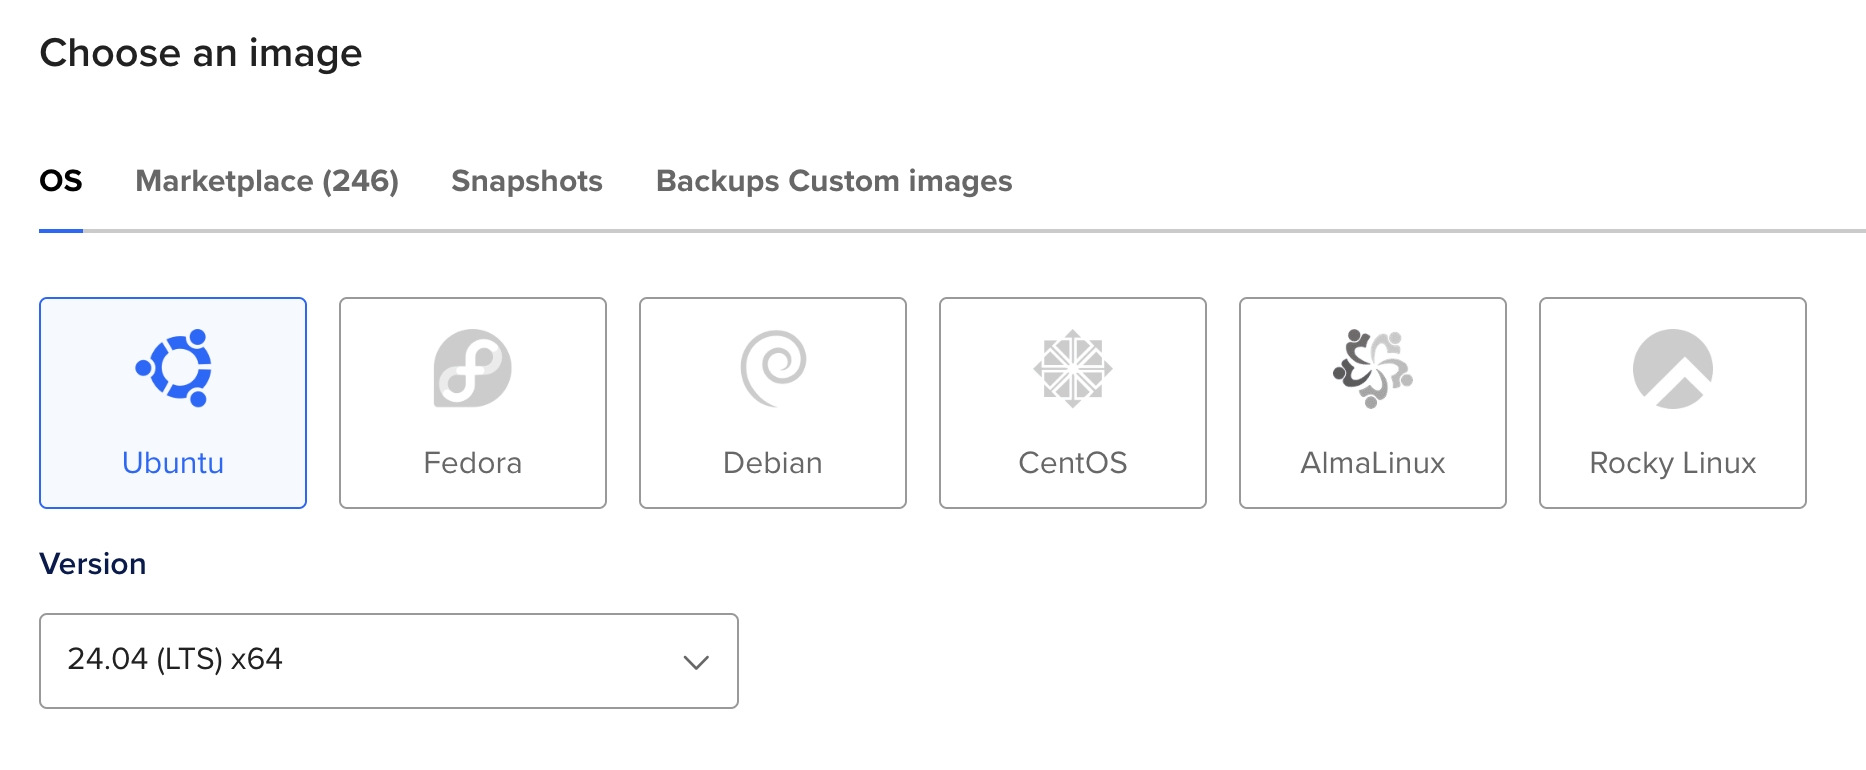
Step 1: Choose your operating system

We want to use Ubuntu 24.04 for our server's operating system. It's an long-term support (LTS) release which means it will receive security updates for several more years than normal. This is crucial for production.

Choose Ubuntu 24.04 from the dropdown in the Choose an image section.

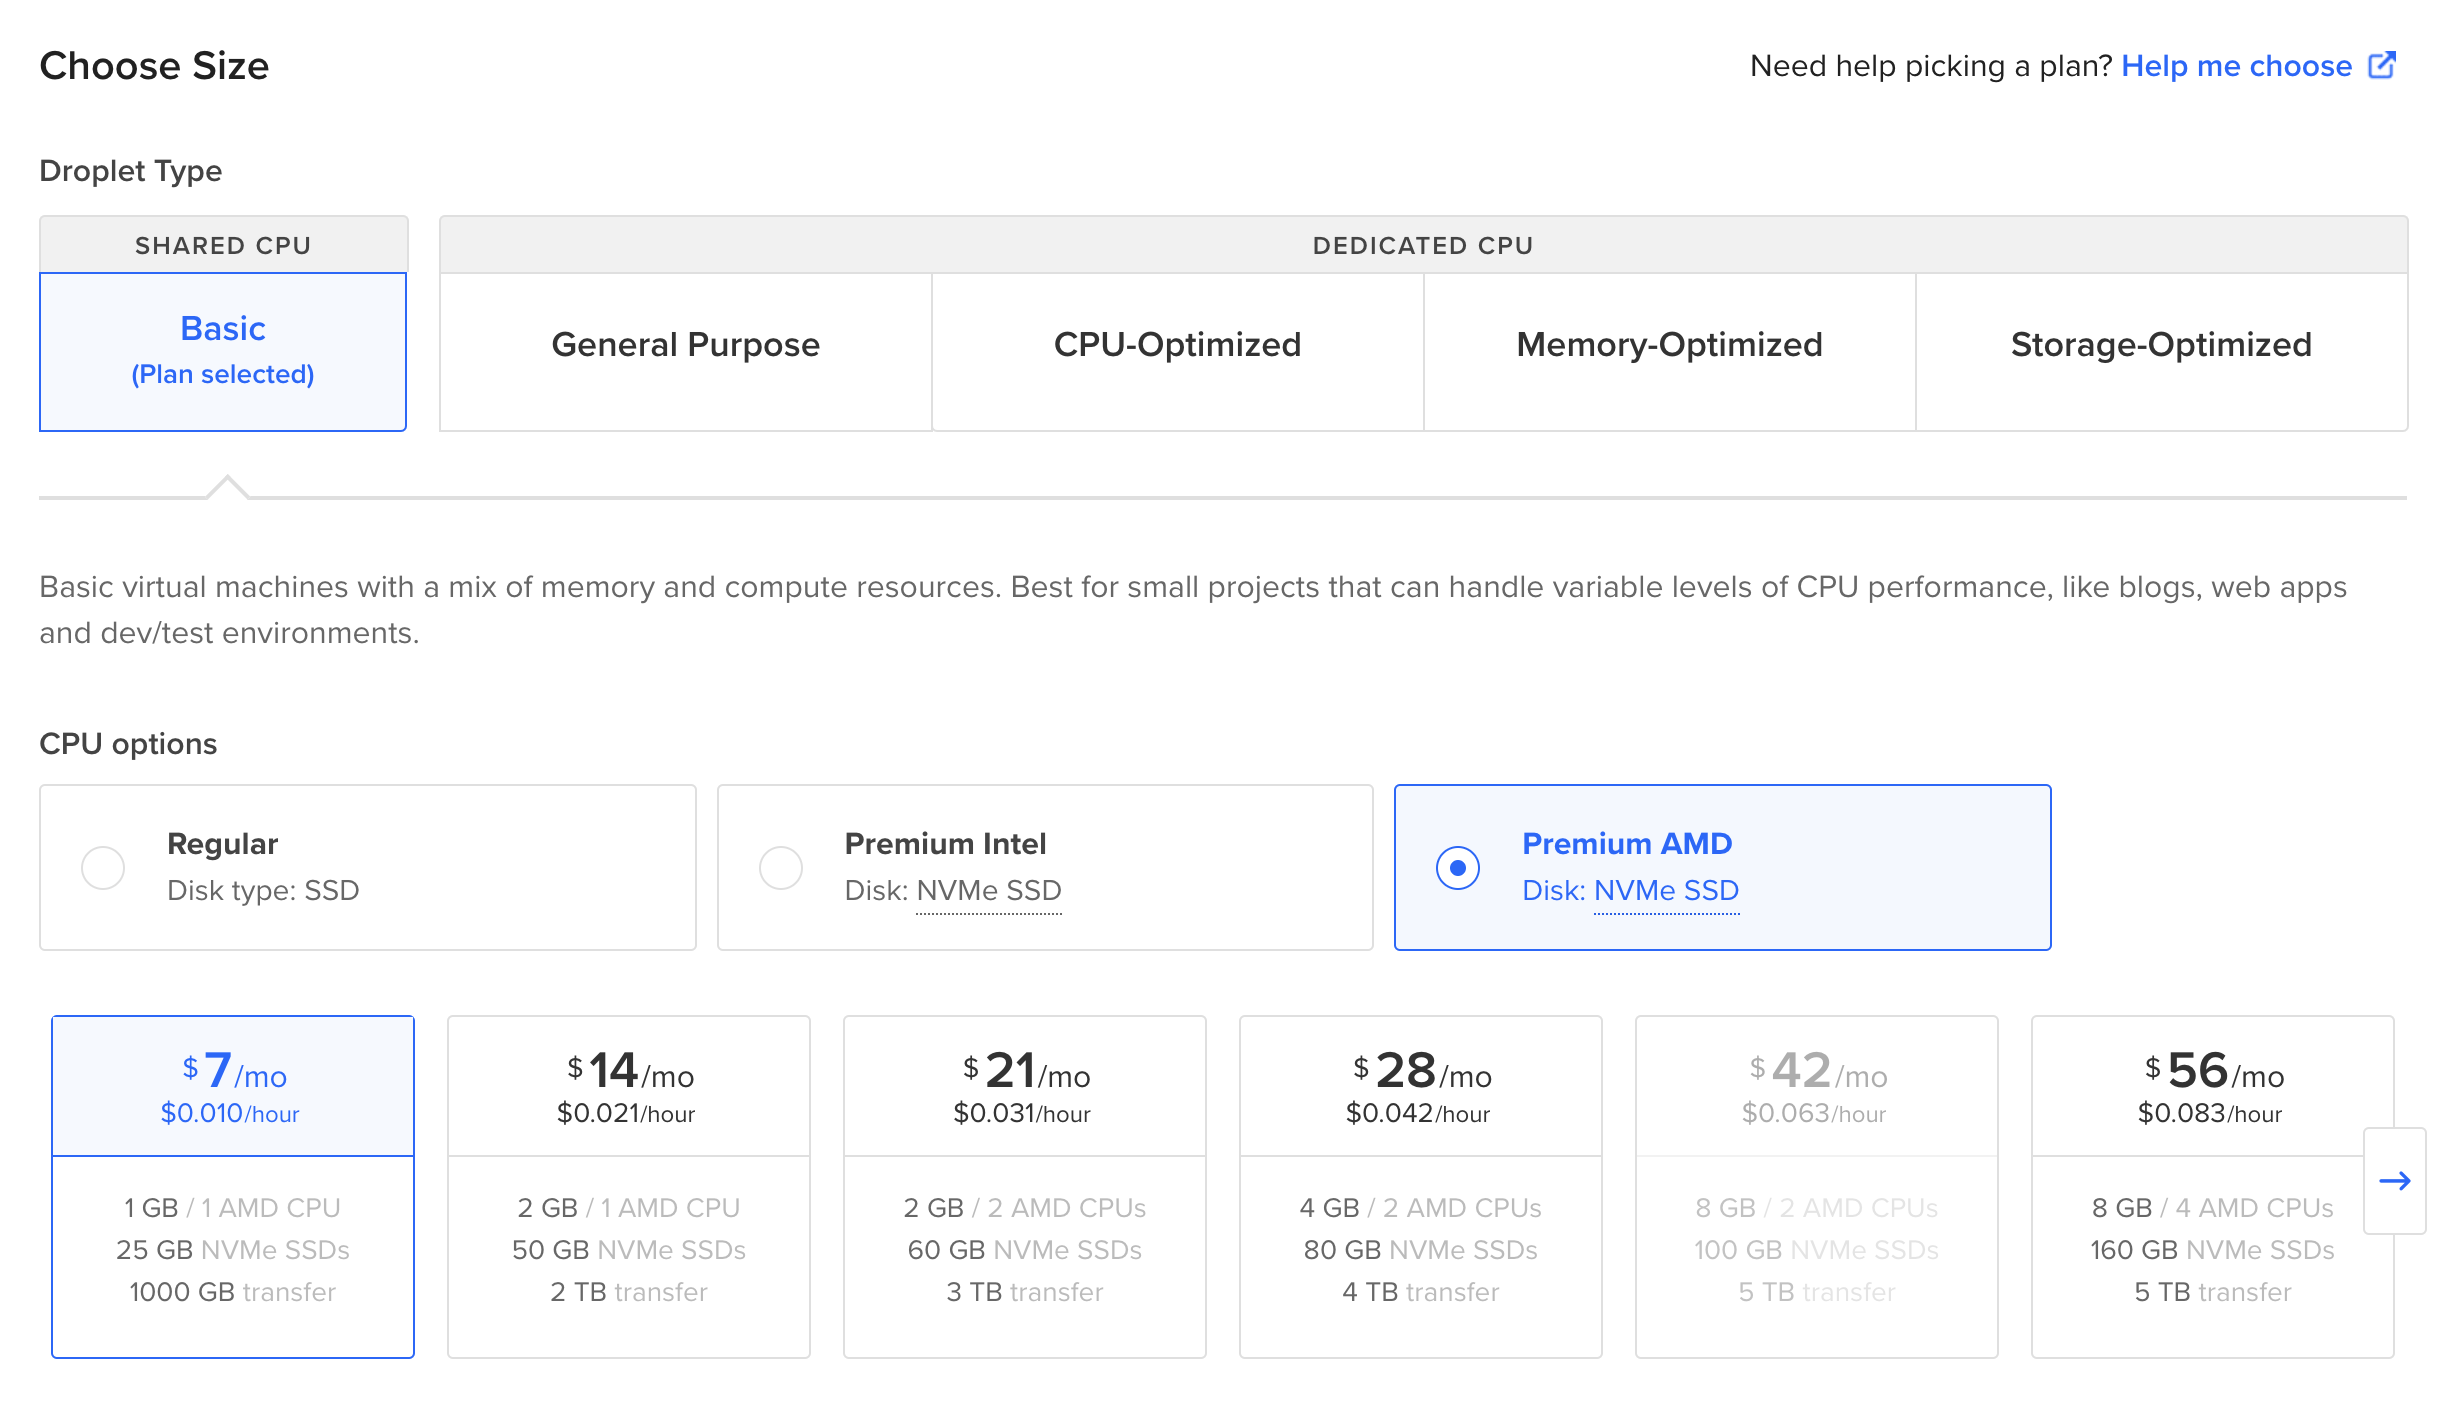
Step 2: Choose your size

Go ahead and select the server size under Choose a size based upon what you feel comfortable with.

Not sure what size to use? Just start with a 2GB RAM server. You can always resize the server to a larger size later without losing any data if you want. That's the nice part of these "virtual" servers. They're not real servers, so you easily add more RAM or CPUs to your server at any time.

Step 3: Choose your region

Next we'll choose the server region. This is the datacenter our server lives in. Choose one that's closest to where your users (or you) will be.

Step 4: Optional settings

You can enable a few other options if you choose:

  • Private Networking - Useful if you want to have a separate database server, etc or talk to other servers in the datacenter.

  • IPv6 - Enable this to give your server an IPv6 address. Can't hurt.

  • Monitoring - This is useful to get some rough metrics of server usage.

  • Backups - Backups up your entire server to an image that you can restore from. These usually don't run very often, so you can skip these if you want. Hourly database backups are more useful.

Step 5: Create your server

Last, click "Create" to create your server. It will take about 60 seconds for DigitalOcean to create your server.

Once that's complete, check your email for the password to the new server.

You can login to your server as root by running the following command, just change 1.2.3.4 to your server's public IP address:

Local Machine
ssh root@1.2.3.4

Step 6: Creating a Deploy user

To run software on our server, we're going to create a deploy user. The deploy user has limited permissions in production to help prevent anyone from getting full control of our server if a hacker broke into our server.

While logged in as root on the server, we can run the following commands to create the deploy user and add them to the sudo group.

root@1.2.3.4
adduser deploy
adduser deploy sudo
exit

Next let's add our SSH key to the server to make it faster to login. We're using a tool called ssh-copy-id for this.

If you're on a Mac, you may need to install ssh-copy-id with homebrew first: brew install ssh-copy-id

Local Machine
ssh-copy-id root@1.2.3.4
ssh-copy-id deploy@1.2.3.4

Now you can login as either root or deploy without having to type in a password!

For the rest of this tutorial, we want to be logged in as deploy to setup everything. Let's SSH in as deploy now and we shouldn't be prompted for a password this time.

Local Machine
ssh deploy@1.2.3.4
Chapter 2:

Installing Ruby


Installing Ruby in production is similar to development except we need to make sure we have all the Linux dependencies installed to compile Ruby correctly.

We also want to use a Ruby version manager for this so we can easily deploy new versions of Ruby to production in the future without having to edit config files.

Installing Ruby

We're going to be installing Ruby using a ruby version manager. You're probably using one in development, but this is also handy in production so it allows you to upgrade Ruby version in production quickly.

The first step is to install some dependencies for compiling Ruby as well as some Rails dependencies.

To make sure we have everything necessary for Webpacker support in Rails, we're first going to start by adding the Node.js and Yarn repositories to our system before installing them.

We're also going to install Redis so we can use ActionCable for websockets in production as well. You might also want to configure Redis as your production store for caching.

Make sure you're logged in as the deploy user on the server, and run the following commands:

deploy@1.2.3.4
# Adding Node.js repository
curl -sL https://deb.nodesource.com/setup_lts.x | sudo -E bash -
# Adding Yarn repository
curl -sS https://dl.yarnpkg.com/debian/pubkey.gpg | sudo apt-key add -
echo "deb https://dl.yarnpkg.com/debian/ stable main" | sudo tee /etc/apt/sources.list.d/yarn.list
sudo add-apt-repository ppa:chris-lea/redis-server
# Refresh our packages list with the new repositories
sudo apt-get update
# Install our dependencies for compiiling Ruby along with Node.js and Yarn
sudo apt-get install git-core curl zlib1g-dev build-essential libssl-dev libreadline-dev libyaml-dev libsqlite3-dev sqlite3 libxml2-dev libxslt1-dev libcurl4-openssl-dev software-properties-common libffi-dev dirmngr gnupg apt-transport-https ca-certificates redis-server redis-tools nodejs yarn

Yay! Now that we have our dependencies installed, we can begin installing Ruby.

Choose the version of Ruby you want to install:

Next we're going to install Ruby using a Ruby version mmanager called rbenv. It is the easiest and simplest option, plus it comes with some handy plugins to let us easily manage environment variables in production.

deploy@1.2.3.4
git clone https://github.com/rbenv/rbenv.git ~/.rbenv
echo 'export PATH="$HOME/.rbenv/bin:$PATH"' >> ~/.bashrc
echo 'eval "$(rbenv init -)"' >> ~/.bashrc
git clone https://github.com/rbenv/ruby-build.git ~/.rbenv/plugins/ruby-build
echo 'export PATH="$HOME/.rbenv/plugins/ruby-build/bin:$PATH"' >> ~/.bashrc
git clone https://github.com/rbenv/rbenv-vars.git ~/.rbenv/plugins/rbenv-vars
exec $SHELL
rbenv install 3.3.5
rbenv global 3.3.5
ruby -v
# ruby 3.3.5

The last step is to install Bundler:

deploy@1.2.3.4
# This installs the latest Bundler, currently 2.x.
gem install bundler
# For older apps that require Bundler 1.x, you can install it as well.
gem install bundler -v 1.17.3
# Test and make sure bundler is installed correctly, you should see a version number.
bundle -v
# Bundler version 2.0

If it tells you bundle not found, run rbenv rehash and try again.

Chapter 3:

Configuring A Web Server


Rails won't live on its own in production. In front of Rails, we'll put up NGINX to handle SSL and serving static files because it's way faster than Ruby.

To run our Rails app, we'll install the Passenger module for NGINX to forward requests over to Rails.

Installing NGINX & Passenger

For production, we'll be using NGINX as our webserver to receive HTTP requests. Those requests will then be handed over to Passenger which will run our Ruby app.

Installing Passenger is pretty straightforward. We'll add their repository and then install and configure their packages.

deploy@1.2.3.4
sudo apt-key adv --keyserver hkp://keyserver.ubuntu.com:80 --recv-keys 561F9B9CAC40B2F7
sudo sh -c 'echo deb https://oss-binaries.phusionpassenger.com/apt/passenger $(lsb_release -cs) main > /etc/apt/sources.list.d/passenger.list'
sudo apt-get update
sudo apt-get install -y nginx-extras libnginx-mod-http-passenger
if [ ! -f /etc/nginx/modules-enabled/50-mod-http-passenger.conf ]; then sudo ln -s /usr/share/nginx/modules-available/mod-http-passenger.load /etc/nginx/modules-enabled/50-mod-http-passenger.conf ; fi
sudo ls /etc/nginx/conf.d/mod-http-passenger.conf

Now that we have NGINX and Passenger installed, we need to point Passenger to the correct version of Ruby.

We'll start by opening up the Passenger config file in your favorite editor, nano or vim

deploy@1.2.3.4
# If you want to use the Nano for editing
sudo nano /etc/nginx/conf.d/mod-http-passenger.conf
# If you want to use the Vim for editing
sudo vim /etc/nginx/conf.d/mod-http-passenger.conf

We simply want to change the passenger_ruby line to match the following:

passenger_ruby /home/deploy/.rbenv/shims/ruby;

Save this file and we'll start NGINX.

deploy@1.2.3.4
sudo service nginx start

You can check and make sure NGINX is running by visiting your server's public IP address in your browser and you should be greeted with the "Welcome to NGINX" message.

Next we're going to remove this default NGINX server and add one for our application instead.

deploy@1.2.3.4
sudo rm /etc/nginx/sites-enabled/default
# If you want to use the Nano for editing
sudo nano /etc/nginx/sites-enabled/myapp
# If you want to use the Vim for editing
sudo vim /etc/nginx/sites-enabled/myapp

We want the contents of our NGINX site to look like the following.

Change myapp to the name of your app. We'll use this same folder later on when we define our Capistrano deploy_to folder.

server {
  listen 80;
  listen [::]:80;

  server_name _;
  root /home/deploy/myapp/current/public;

  passenger_enabled on;
  passenger_app_env production;

  location /cable {
    passenger_app_group_name myapp_websocket;
    passenger_force_max_concurrent_requests_per_process 0;
  }

  # Allow uploads up to 100MB in size
  client_max_body_size 100m;

  location ~ ^/(assets|packs) {
    expires max;
    gzip_static on;
  }
}

Save the file and then we'll reload NGINX to load the new server files.

deploy@1.2.3.4
sudo service nginx reload
Chapter 4:

Creating A Database


For production, we'll need to create a new database for all our production records.

We recommend running PostgreSQL, but we'll also include MySQL for those of you more familiar with it.

We recommend PostgreSQL for your production database but feel free to use MySQL instead. Just follow the instructions for the database you want to use and skip to the next part when you're done.

Creating a PostgreSQL Database

For Postgres, we're going to start by installing the Postgres server and libpq which will allow us to compile the pg rubygem.

Then, we're going to become the postgres linux user who has full access to the database and use that account to create a new database user for our apps. We'll call that user deploy.

And finally, the last command will create a database called myapp and make the deploy user owner.

Make sure to change myapp to the name of your application.

deploy@1.2.3.4
sudo apt-get install postgresql postgresql-contrib libpq-dev
sudo su - postgres
createuser --pwprompt deploy
createdb -O deploy myapp
exit

You can manually connect to your database anytime by running psql -U deploy -W -h 127.0.0.1 -d myapp. Make sure to use 127.0.0.1 when connecting to the database instead of localhost.

Creating a MySQL Database

For MySQL, we'll install both the server and client libraries so we can compile the mysql2 rubygem.

deploy@1.2.3.4
sudo apt-get install mysql-server mysql-client libmysqlclient-dev
sudo mysql_secure_installation
# Open the MySQL CLI to create the user and database
mysql -u root -p

Now we're inside the MySQL command line interface, we can create a database for our app and a special user who only has access to this database. Having an app-specific user will provide better security in case something gets compromised.

It may look like we're creating two users and that's because MySQL treats users over localhost different than users over an IP address. We're setting it up so you can do both.

In the following example, make sure you replace the following names:

  • myapp with the name of your database, typically the name of your app
  • $omeFancyPassword123 with your own password
  • deploy with the name of your database user if you'd like something different
deploy@1.2.3.4
CREATE DATABASE IF NOT EXISTS myapp;
CREATE USER IF NOT EXISTS 'deploy'@'localhost' IDENTIFIED BY '$omeFancyPassword123';
CREATE USER IF NOT EXISTS 'deploy'@'%' IDENTIFIED BY '$omeFancyPassword123';
GRANT ALL PRIVILEGES ON myapp.* TO 'deploy'@'localhost';
GRANT ALL PRIVILEGES ON myapp.* TO 'deploy'@'%';
FLUSH PRIVILEGES;
\q
Chapter 5:

Deploying Code


Once we have everything on our server configured and ready to go, we need a way to upload our code to production.

Capistrano is a tool for making copies of your repository in production and then easily making new releases.

Setting Up Capistrano

Back on our local machine, we can install Capistrano in our Rails app.

We'll need to add the following gems to our Gemfile:

gem 'capistrano', '~> 3.11'
gem 'capistrano-rails', '~> 1.4'
gem 'capistrano-passenger', '~> 0.2.0'
gem 'capistrano-rbenv', '~> 2.1', '>= 2.1.4'

Once added, we can run the following to install the gems and have Capistrano install its config files:

Local Machine
bundle
cap install STAGES=production

This generates several files for us:

  • Capfile
  • config/deploy.rb
  • config/deploy/production.rb

We're need to edit the Capfile and add the following lines:

require 'capistrano/rails'
require 'capistrano/passenger'
require 'capistrano/rbenv'

set :rbenv_type, :user
set :rbenv_ruby, '3.3.5'

Then we can modify config/deploy.rb to define our application and git repo details.

set :application, "myapp"
set :repo_url, "git@github.com:username/myapp.git"

# Deploy to the user's home directory
set :deploy_to, "/home/deploy/#{fetch :application}"

append :linked_dirs, 'log', 'tmp/pids', 'tmp/cache', 'tmp/sockets', 'vendor/bundle', '.bundle', 'public/system', 'public/uploads'

# Only keep the last 5 releases to save disk space
set :keep_releases, 5

# Optionally, you can symlink your database.yml and/or secrets.yml file from the shared directory during deploy
# This is useful if you don't want to use ENV variables
# append :linked_files, 'config/database.yml', 'config/secrets.yml'

Now we need to modify config/deploy/production.rb to point to our server's IP address for production deployments. Make sure to replace 1.2.3.4 with your server's public IP.

server '1.2.3.4', user: 'deploy', roles: %w{app db web}

Before we can deploy our app to production, we need to SSH into the server one last time and add our environment variables.

Local Machine
ssh deploy@1.2.3.4
mkdir /home/deploy/myapp
nano /home/deploy/myapp/.rbenv-vars

Add any environment variables you need for production to this file.

# For Postgres
DATABASE_URL=postgresql://deploy:PASSWORD@127.0.0.1/myapp

# For MySQL
DATABASE_URL=mysql2://deploy:$omeFancyPassword123@localhost/myapp

RAILS_MASTER_KEY=ohai
SECRET_KEY_BASE=1234567890

STRIPE_PUBLIC_KEY=x
STRIPE_PRIVATE_KEY=y
# etc...

Save this file and these environment variables will be automatically loaded every time you run Ruby commands inside your app's directory on the server.

Using this method, we can have separate env variables for every application we deploy to this server.

Now we can deploy our app to production:

Local Machine
cap production deploy

Open your server's IP in your browser and you should be greeted with your Rails application.

If you see an error, you can SSH into the server and view the log files to see what's wrong.

deploy@1.2.3.4
# To view the Rails logs
less /home/deploy/myapp/current/log/production.log
# To view the NGINX and Passenger logs
sudo less /var/log/nginx/error.log

Once you find your error (often times a missing environment variable or config for production), you can fix it and restart or redeploy your app.

Chapter 6:

Next Steps


Congratulations! You've deployed your app to production.

There are several things you may want to do like configuring a domain, SSL, backups, and log rotation.

Here are a few common next steps we highly recommend doing:

Add SSL with LetsEncrypt

Lets Encrypt provides free SSL and every site on the internet should be using SSL.

Hourly Backups

Setting up hourly backups to S3 makes sure that you can recover quickly in case anything bad happens.

Setup Log Rotation

This helps make sure your Rails logs don't fill your disk space and crash your server.

Want to stay up-to-date with Ruby on Rails?

Join 85,972+ developers who get early access to new tutorials, screencasts, articles, and more.

    We care about the protection of your data. Read our Privacy Policy.